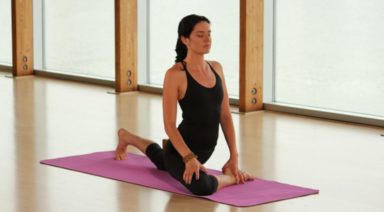
Upset tummy? Try yoga for digestive relief
What else can yoga do for you? If you’ve overeaten or are facing digestive discomfort, fifteen minutes or so of yoga can make all the difference, according to Zayna Gold, creator of Healing Through Movement and a Boston-based yoga instructor. Here are just a few of the poses she recommends for settling your tummy, flattening out bloat, and easing stomach pains.
Don’t worry; these moves are very gentle and will work with the lightest of touches on calming your insides (both literal and metaphorical!). “You will feel less stress when your nervous system is relaxed. The health benefits will spread to the rest of your body and ease your digestion,” says Gold. Plus, the less you train your body to rely on over-the-counter meds like Pepto Bismol and Tums, the better! The natural, effective way is always preferable for long-term benefits.
- Apanasana
Benefits:
Practicing Apanasana, knees-to-chest pose, is a gentle way to restore proper flow and function to the organs of your torso. As you release excess pressure from your digestive organs and low back, your mind will begin to release its pressures and tensions, as well. It’s a simple way to encourage your body, mind, and spirit to remain pure and balanced throughout your day, as well as gives relief from excess digestive air, indigestion, bloating, flatulence, acidity, and constipation. Suffering from irritable bowel syndrome? This is the pose for you.
Plus, this pose helps to keep your low back limber. It is often used as a soothing counter-pose to backbends and spinal twists. Because your body is compact in the pose, your thoughts are more easily drawn inward, which is useful for calming the mind and rebalancing your energy.
However, make sure not to practice this pose if you are recovering from abdominal surgery or a hernia. Also avoid this pose if you have a spinal, knee, or hip injury. If you have a neck injury, do not lift your head.
Try It Out:
-
Begin by lying on your back, with your legs and arms extended.
-
As you exhale, draw both of your knees to your chest. Clasp your hands around them. If it is possible for you, wrap your forearms over your shins and clasp each elbow with the opposite hand.
-
Keep your back flat on the mat. Release your shoulder blades down toward your waist. Broaden across your collar bones.
-
Draw your tailbone and sacrum down toward the mat, lengthening your spine even more.
-
If it is comfortable for you to do so, softly rock backward and forward or side-to-side for a gentle spinal massage.
-
Tuck your chin slightly and gaze down the center line of your body.
-
Hold for up to one minute. Keep your breath smooth and even.
-
With an exhalation, release and extend both legs along the floor and rest. Repeat up to six times.
-
Bridge Pose
Benefits:
Bridge Pose is a chest, heart, and shoulders opener and works to stretch the spine, the back of the neck, the thighs, and the hip flexors (front hip joints). Because your heart is higher than your head in this pose, it is considered a mild inversion (less strenuous than other inversions, such as Headstand) and holds all the benefits of inversions, like relief from stress, fatigue, anxiety, headaches, insomnia, and mild depression. Get ready to have your mind be calmed and your blood pressure treated, and if you have asthma, it’s great for increasing lung capacity by opening the chest.
Why is Bridge Pose so great for digestion? It also stimulates the abdominal organs and thyroid glands, which improves digestion and helps to regulate metabolism. Because it revitalizes the legs and stretches the shoulders, it can be a particularly rejuvenating pose for those who spend the day sitting in front of a computer or driving.
Practicing Bridge Pose can be a potent lesson in learning to slow down and listen to your body. Your spine, shoulders, and thighs will tell you how far to take the pose. The less you push, the more the pose will open up. Turn your awareness inward and notice how your body releases its grip when you don’t force it. Let your Bridge be a connection between your body, mind, and spirit.
Try It Out:
-
Lie supine on the floor, and if necessary, place a thickly folded blanket under your shoulders to protect your neck. Bend your knees and set your feet on the floor, heels as close to the sitting bones as possible.
-
Exhale and, pressing your inner feet and arms actively into the floor, push your tailbone upward toward the pubis, firming (but not hardening) the buttocks, and lift the buttocks off the floor. Keep your thighs and inner feet parallel. Clasp the hands below your pelvis and extend through the arms to help you stay on the tops of your shoulders.
-
Lift your buttocks until the thighs are about parallel to the floor. Keep your knees directly over the heels, but push them forward, away from the hips, and lengthen the tailbone toward the backs of the knees. Lift the pubis toward the navel.
-
Lift your chin slightly away from the sternum and, firming the shoulder blades against your back, press the top of the sternum toward the chin. Firm the outer arms, broaden the shoulder blades, and try to lift the space between them at the base of the neck (where it’s resting on the blanket) up into the torso.
-
Stay in the pose anywhere from 30 seconds to 1 minute. Release with an exhalation, rolling the spine slowly down onto the floor.
-
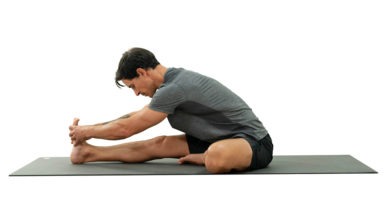
Seated Forward Bend
Benefits:
Seated forward bend, or paschimottanasana, stretches the spine, shoulders, pelvis, and hamstrings. It also stimulates and balances the liver, kidneys, adrenal glands, ovaries, and uterus. And while traditional yoga texts say Paschimottanasana can cure disease, modern-day yoga teachers agree to its many other benefits, which include relief from stress, improved digestion and appetite, relief from menstrual pain and symptoms of menopause, a calmer mind, reduced anxiety and fatigue, improved sleep and relief from insomnia. This pose is also believed to be therapeutic for high blood pressure, infertility, and sinusitis. It is reputed to be beneficial for overcoming obesity, as well.
Though Paschimottanasana can feel “intense,” it can be easy to push your body too much, seeking more intense sensations as signs of progress. Be careful not to misinterpret painful, sharp, or piercing sensations as positive signs! Back off if you are injuring yourself.
The more you relax in the pose, the more naturally your body will open up. Forcing forward folds will actually cause your muscles to shorten and resist even more. Breathe deeply and evenly. Settle into the moment. Turn your thoughts inward and allow resistance to gently fade away.
Try It Out:
-
Sit on the floor with your buttocks supported on a folded blanket and your legs straight in front of you. Press actively through your heels. Rock slightly onto your left buttock, and pull your right sitting bone away from the heel with your right hand. Repeat on the other side. Turn the top thighs in slightly and press them down into the floor. Press through your palms or finger tips on the floor beside your hips and lift the top of the sternum toward the ceiling as the top thighs descend.
-
Draw the inner groins deep into the pelvis. Inhale, and keeping the front torso long, lean forward from the hip joints, not the waist. Lengthen the tailbone away from the back of your pelvis. If possible take the sides of the feet with your hands, thumbs on the soles, elbows fully extended; if this isn’t possible, loop a strap around the foot soles, and hold the strap firmly. Be sure your elbows are straight, not bent.
-
When you are ready to go further, don’t forcefully pull yourself into the forward bend, whether your hands are on the feet or holding the strap. Always lengthen the front torso into the pose, keeping your head raised. If you are holding the feet, bend the elbows out to the sides and lift them away from the floor; if holding the strap, lighten your grip and walk the hands forward, keeping the arms long. The lower belly should touch the thighs first, then the upper belly, then the ribs, and the head last.
-
With each inhalation, lift and lengthen the front torso just slightly; with each exhalation release a little more fully into the forward bend. In this way the torso oscillates and lengthens almost imperceptibly with the breath. Eventually you may be able to stretch the arms out beyond the feet on the floor.
-
Stay in the pose anywhere from 1 to 3 minutes. To come up, first lift the torso away from the thighs and straighten the elbows again if they are bent. Then inhale and lift the torso up by pulling the tailbone down and into the pelvis.
-
Balasana/Child’s Pose
Benefits:
The perfect way to wrap up your yoga therapy, Child’s Pose helps to stretch the hips, thighs, and ankles while reducing stress and fatigue. It gently relaxes the muscles on the front of the body while softly and passively stretching the muscles of the back torso.
This resting pose centers, calms, and soothes the brain, making it a therapeutic posture for relieving stress. When performed with the head and torso supported, it can also help relieve back and neck pain. Sometimes used as a counter-pose to backbends, Child’s Pose restores balance and equanimity to the body.
Life is the period between one breath and the next; the person who only half breathes, only half lives. He who breathes correctly acquires control of the whole being.
Regular practice of Child’s Pose also teaches conscious exploration of the breath. As the front of the body releases onto the thighs, the frontal ribs and abdominal muscles become slightly compressed. This restriction allows for a deeper opening of the back of the torso as the lungs expand behind the body. As this happens, keeping the breath slow, long, and steady allows for a new awareness of the breath’s path through the front and back of the body.
Try It Out:
-
Kneel on the floor. Touch your big toes together and sit on your heels, then separate your knees about as wide as your hips.
-
Exhale and lay your torso down between your thighs. Broaden your sacrum across the back of your pelvis and narrow your hip points toward the navel, so that they nestle down onto the inner thighs. Lengthen your tailbone away from the back of the pelvis while you lift the base of your skull away from the back of your neck.
-
Lay your hands on the floor alongside your torso, palms up, and release the fronts of your shoulders toward the floor. Feel how the weight of the front shoulders pulls the shoulder blades wide across your back.
-
Balasana is a resting pose. Stay anywhere from 30 seconds to a few minutes. Beginners can also use Balasana to get a taste of a deep forward bend, where the torso rests on the thighs. Stay in the pose from 1 to 3 minutes. To come up, first lengthen the front torso, and then with an inhalation lift from the tailbone as it presses down and into the pelvis.
About the Author

Yoga and Lymphatic Circulation

According to Live Science, “the lymphatic system is a network of tissues and organs that help rid the body of toxins, waste and other unwanted materials,” including a fluid that contains white blood cells that help fight infections. You are probably most familiar with the lymph nodes in the lymphatic system, but the lymphatic system travels through your body from your tonsils and adenoids to your spleen. There are lymph nodes located around vital organs like your heart and lungs and in your armpit and near your groin area.
This internal system produces the antibodies necessary to kill bad actors in your body and prevent an infection in one part of your body from spreading to another. If your lymphatic system stops working, fluids begin to build up in your body and several different conditions can occur, including infections, swollen glands, blockages, autoimmune disorders, certain types of cancer, and lymphedema. Since the lymphatic system travels through so many parts of your body, it is crucial that we keep it healthy.
Yoga and Lymphatic Circulation
As you may know, yoga is one of the best practices for strengthening the body and reducing stress. What you might not realize is the role yoga plays in increasing circulation throughout the body. Increasing circulation helps allow the lymphatic system to transport good stuff and filter out the bad, which means that any amount or type of yoga will improve your lymphatic system.
Think of the lymphatic system as a super highway that filters toxins and circulates antibodies throughout your body. This system is critical to getting you better when you are sick. Moreover, unlike the way blood travels through the body, the heart does not control the pumping of the lymphatic system. Instead, the system moves by muscular contractions. Even more reason to strengthen your muscles.
One aspect of yoga that has dramatic effects on the lymphatic system is pranayama. Pranayama is the practice of deep, controlled breathing. By practicing these deep breaths, you are able to better circulate good fluids throughout your body and remove bad toxins.
Routine Maintenance of the Lymphatic System
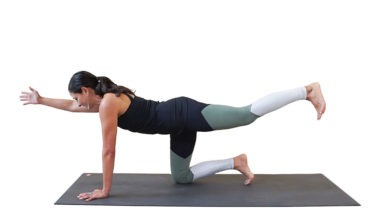
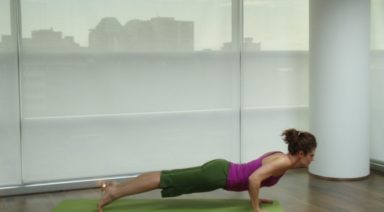
Yoga poses that invert the legs and allow gravity to act on the lymphatic channels are particularly helpful to keeping the system flowing and functioning optimally. In addition to these type of poses, any dynamic postures that build heat and keep the body moving are also beneficial. For these yoga postures to be the most productive, focus more on your breath than perfecting the postures. Below are some sample poses to get you started:
Downward Facing Dog Adho Mukha Svanasana
A classic pose, but did you know that it builds strength throughout the body and improves the functioning of your immune system? To attempt this pose, firmly plant your feet at the bottom of your mat, then place your hands at the top of your mat so that your body forms an upside V. If you are already under-the-weather when you try this, have a block nearby to rest your head.
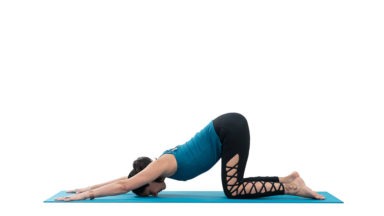
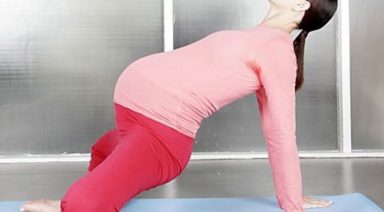
Cat-Cow – Bitilasana
By far my favorite yoga pose, Cat-Cow gets everything flowing with only moderate effort. First, go into Tabletop pose (your hands and knees firmly planted on your mat, with your toes pointed behind you). Now arch your back like a cat, letting your gaze fall to the floor in between your outstretched hands. Next, curve your spine the other way your body forms a U the other way. Your head should face towards the ceiling. Do this at least two dozen times, then rest in Child’s Pose to finish.
Sun Salutations are a great way to build strength and increase circulation throughout the body.
Standing Forward Bend – Uttanasana
Gather two blocks before planting your feet firmly on the back of your mat. Spread your feet a little wider than hip-widths apart and then rest your head on top of the bricks. Stay here for several deep breaths.
Other Practices to Improve Lymphatic System
- Water, water and more water. Drinking plenty of fluids is far and away the best method for improving and maintaining all of the systems in your body.
- Go for a brisk walk. Keep your arms and legs moving and walk faster than normal. This will jumpstart your lymphatic system and get all the good stuff flowing.
- In addition to the restorative yoga and low-intensity positions, there are other types of yoga for when you are sick, including Yin Yoga specially tailored to the winter cold and flu season.
Poses for a Weak Lymphatic System
I’ll be honest, I am the worst when I’m sick. Rarely do I feel like anything more than sitting on the sofa and watching reruns, much less partaking in a full yoga session. But, if you are able to get yourself up and moving, there are some low-intensity postures that can help a cold run its course faster so you can get back to feeling like yourself again.
A cold or allergies means that your lymphatic system is blocked. In addition to whatever your doctor recommends, include these chest-opening yoga postures into your get-well-soon regime.
Start by dimming the lights in the room and have extra blankets and blocks nearby, as the last thing you want to do is over-exert yourself. Feel free to turn any of these poses into supported poses. These postures should be done more like restorative yoga.
Bridge Pose is a great chest opener, but if you are feeling under-the-weather try the Supported Bridge Pose – Setu Bandha Sarvangasana – it is much easier on achy joints. Lie down on your mat with your palms down. Bending your knees, pull your heels towards your fingertips. Then push down with your hands to lift your hips up, while you slide a brick lengthwise under your torso. Lastly, pull your shoulder blades in towards each other as much as possible. You should feel your chest opening. Close your eyes and relax while gravity does the work for you.
Bow Pose – Dhanurasana
Traditionally best for strengthening your abdomen, but also stimulates your thymus gland and rejuvenates the parts of the lymphatic system closest to your chest. Try this pose when you have a lot of post-nasal drip flowing into your chest. Begin face-down on your mat – extra blankets are suggested for this one. Separate your legs on the mat about hips-width. Take several deep breaths. Then, as your release your breath, grab hold of your ankles so that your body is shaped like an archer’s bow. Continue to lift your thighs off the mat until you exhale and lower yourself back down to the mat. Repeat two to three times.
Cobra Pose – Bhujangasana
Often part of Sun Salutations, Cobra Pose is another ideal chest opener. Lie face-down on your mat and take several deep breaths. Place your hands, fingers spread wide, on the mat under your shoulders. Press your body into your mat and as you inhale, begin to straighten your arms. You will rise off the mat, except your hands and the tops of your feet. Keep your body tightened. Bend your head back slightly so your gaze moves from in front of you towards the ceiling. Hold this for your full breath, then come back to your mat and exhale. Repeat for a minute.
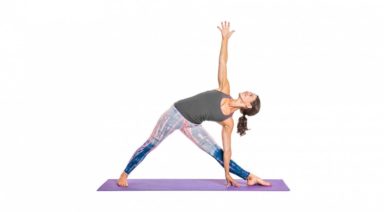
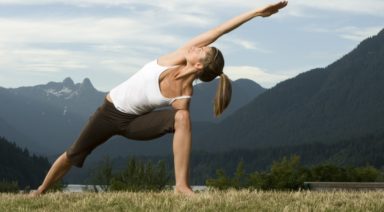
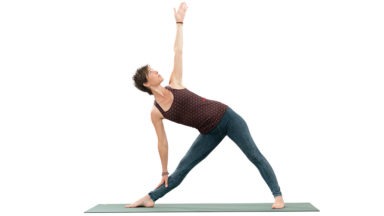
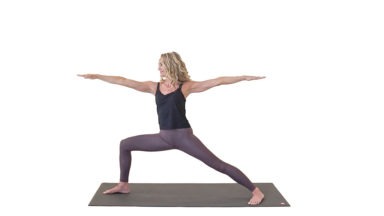
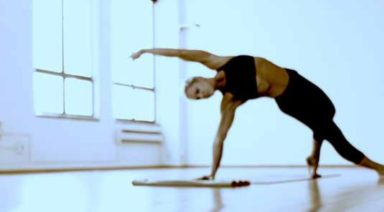
Extended Triangle Pose – Utthita Trikonasana (as pictured above)
Spread your legs wide so you take up the entire mat lengthwise. Your left foot should be pointed towards the front of the room; your back or right foot turned perpendicular to your front foot. Keep your abdomen tucked in. Put your left hand on your left ankle and hold on. Then, twist your right arm towards the ceiling and hold for three deep breaths. Now switch arms and hold for another three breaths.
Legs Up the Wall – Viparita Karani
Last, but not least, this pose lets gravity do the work so you can relax. Move your mat up against the wall at place a blanket or two on top. Lie on top of the blankets with your bottom against the wall and your legs going up the wall. You should form an “L.” Stretch out your arms so your torso and arms form a “T.” Then, close your eyes and lie there for at least fifteen minutes. I don’t know about you, but – sick or not sick – I could do this one all day!