Yoga Nidra Meditation: Best Kept Secret to Deep Relaxation
Chances are you’ve been in a yoga class where the teacher gives verbal cues or instruction during a usually silent savasana. You’re encouraged to breathe deeply, visualize, or focus on specific body parts, one at a time. As you leave the studio, you wonder: What happened during final savasana? Why do I feel so great? How did I get this incredibly calm and relaxed? It’s not magic–your teacher most likely just incorporated a few aspects of Yoga Nidra meditation into the final posture.
What is Yoga Nidra?
Is it a pose? Guided imagery? An affirmation? A visualization tool? Mind-body therapy? A relaxation exercise? Yoga Nidra can be all of these things, and more–in essence, it’s a highly effective meditation technique that’s been around for thousands of years. Here’s a primer from some of our Gaia experts to help explain and demystify the practice of Yoga Nidra:
Armand Sagredo says that the method is so inherently powerful it had been kept secret for nearly 4,000 years, until the 1960’s. Through Yoga Nidra you can enter the realm of the subconscious and create effective, seemingly magical changes in your life, and relax your nervous system in the most powerful way available to humans without chemical agents. read more from Armand
Yoga Nidra is a secret weapon many yogis swear by and one hour of the meditation can be as effective as three hours of regular sleep. It’s not about conscious effort, but about conscious relaxation.
Gwendoline Odeluga tells us that Yoga Nidra is a scientific method for achieving a deep state of relaxation, and is also a bridge to the higher branches of Yoga. During a session, she says, you are not in a deep sleep–you are still fully aware. You relax physically yet stay mentally alert and in a place of great creativity. Yoga Nidra makes it possible to effect profound change in your body, mind, and life. read more from Gwendoline
Yoga Nidra is a technique that increases awareness of sensation in the muscular, connective and nerve tissues, David Flores explains, by breathing into those areas and sending signals for relaxation. You can feel energy flowing up and down the chakras–it’s even possible, with ongoing practice, to dissolve sensations from the body altogether. He says that Yoga Nidra is like a “voice-guided eraser that slowly fades your body into the ether.” read more from David
Doesn’t a “voice-guided eraser” sound like an amazing tool for relaxation and stress-reduction? It is! And it’s so simple and effective, you can practice anytime you need to take the edge off disturbing thoughts, raging emotions, bodily tension or a combination of all three.
According to the Yoga Nidra Network’s resource guide, there are a variety of approaches to the practice of Yoga Nidra, each with its own value and purpose. The easiest way to begin is to have a yoga teacher walk you through the steps or follow an audio version of a guided meditation. The recordings are all a little different: short or lengthy; music in the background or quiet; deep or soothing vocals; various scripts for sleep, tension relief, focusing, intention, and more. Choose an audio guide with the voice, tone and sequencing right for you.
A 10 Step Guide to Deep Relaxation with Yoga Nidra Meditation
Here’s a sample of what a Yoga Nidra session might look like. Thanks so much to our gaia.com expert Jill Miller for providing the template for this beginner’s guide. And remember that this is just one example–there are many Yoga Nidra practices to choose from!
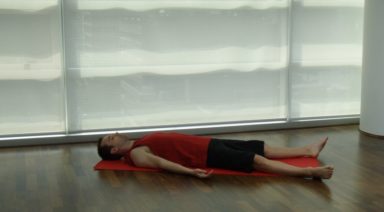
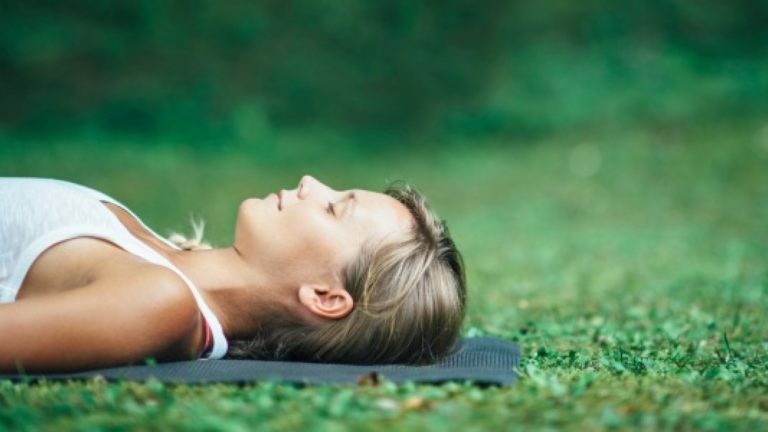
- Take time to get comfortable. Give yourself at least 10-15 minutes for a short version of the practice. Lie down in a quiet, calm environment. Cover yourself with a light blanket; you can also cover your eyes with a towel, if helpful. Try to remain still and present. Close your eyes and relax–get ready to follow the sound of the voice guiding your practice.
- Set your sankalpa. Visualize a deep resolve or positive intention for your Yoga Nidra. You can say it out loud or to yourself a few times. Feel the sankalpa spread throughout your body, suffusing your awareness. Then release the intention and let it go. The seeds of the intention will remain even after you drop your conscious focus. You can learn more about the power of sankalpa in Cheryl Lyn’s informative article, Magical Map to Manifesting with Yoga Nidra.
- Open your senses. Welcome any smells, tastes, sounds or sensations in your current environment. Notice feelings, thoughts and images as they arise and fade away–let your body and mind just “be.” With eyes closed, allow your internal vision to take shape. Rest easy, but stay curious and open to the practice. Focus your attention on each particular instruction as prompted by the audio guide.
- Become aware of your breathing. Breathe in and out through your nose with simple, welcoming breaths. Notice the flow–invite your breath in and then out. Remember to take slow, relaxing breaths, not ujjayi breaths. Release a bit of tension with each successive outbreath. Vijai Sharma, Ph.D., says to use the imagination in order to increase the exhalation. He encourages us to imagine inhaling through the crown of the head straight to the heart, and then exhaling from the heart all the way down to the toes and soles of the feet. Imagine taking a whole body inhale, and then a whole body exhale. Repeat a few times.
- Practice countdown breaths. Next, breathe in while mentally saying the number ’40.’ Breathe out and mentally say the number ’39.’ The next inhale is ’38,’and the next exhale is ’37.’ Keep counting backward all the way down to ‘1.’ There’s no need to rush. Don’t get frustrated if you miss a number. Be friendly to yourself if you fall asleep or forget to count–begin counting again when you get the next cue from the instructor. Feel yourself relaxing more deeply with each outbreath as you count backward from 40 to 1.
- Progressively relax your muscles. Relax every muscle in your body by squeezing and releasing–focus on each unique muscle or muscle group as you go. For example, your instructor might ask you to tighten your hands as much as you can–tighter, tighter–and then release. Each Yoga Nidra uses different sequences or progressions to take you through the body; just go with it. Don’t overthink or force yourself to concentrate; simply follow the guiding voice from location to location within your body. You can subtly encourage each muscle to “breathe a little with you,” in and out, as you tighten and release.
- Become aware of your whole body. Now let go of the tightening sequence and take a full body tour. First, become aware of your whole body all at once. How do you feel? Let yourself be light and weightless, or heavy and dense–just experience whatever arises. Your guide may ask you to move your awareness to different parts of your relaxed body–organs, muscles, joints, skin and more–maybe into places you never even knew existed! Welcome any sensations you find there. Keep still as you continue to focus attention on each body part.
- Bring in the light! As you move through the sequence, the instructor may prompt you to imagine your awareness as a golden light touching each part of your body. Caress your eyes, your fingers, the space between your organs, your navel–suffuse your entire body, heart and mind with soothing light. Next, radiate that light outward–first to friends and family, then to everyone you know. Finally, radiate light everywhere, to all beings, and imagine light being sent back to you just as you are sending light out to them. Continue giving and receiving; let your sense of self and others start to dissolve. Bask in the radiant, shared sensation.
- Take some final breaths. Now come back to your breath. Don’t think too much about it–just experience the movement, in and out. Let your breath hold you, nurture you. You might be asked to revisit your sankalpa (intention).You can do so on an inbreath, and let it go again on an outbreath. Then return to the gentle rhythm of your natural respiration.
- Close the practice. Wiggle your fingers and toes. Start to move your body around. Notice: Do you feel energized and awake? Relaxed and peaceful? Tender and loving? Gently roll onto your side and sit up. Open your eyes and come back to waking life. Has your awareness changed? Feel any warmth, joy or soothing feelings you’ve generated in your body, mind, spirit…and beyond.
Sound intriguing? Yoga Nidra can be used as a tool for deep relaxation, but it’s also a fulfilling spiritual practice. Try this Yoga Nidra guided meditation and enjoy a dose of yogic “deep rest”–try it today.
And don’t just read about it: Get comfortable, open your ears, and give a listen. Remember how good you felt after your instructor incorporated just a few elements of Yoga Nidra into that final savasana? You can come home to yourself every day with that same deep relaxation–all you have to do is practice Yoga Nidra meditation.
About the Author
Yoga for Insomnia

Not getting enough sleep or waking up in the middle of the night is the worst, except maybe not being able to get to sleep in the first place. Tossing and turning when all you want to do is catch some much needed zzzzzzzs is miserable. Lack of sleep can also increase risk of illness and decrease productivity. Roughly 60 million Americans are affected by chronic sleeplessness; women and people over the age of 65 are disproportionately impacted by this disorder.
There are a million reasons sleep can be elusive. Perhaps you have too much on your mind or maybe you are already anxious about everything you need to accomplish the next day. You also could be dealing with a more serious condition like insomnia. For a chronic problem, see your physician, but there are also some simple things you can do to combat occasional sleeplessness.
Insomnia runs in my family. If I have learned anything from my family members, it is that sleeplessness is more about getting your mind right and adjusting your daily habits and less about knocking yourself out with medication.
Why Yoga for Sleep?
According to Science Daily, “sometimes called the rest and digest system, the parasympathetic system conserves energy as it slows the heart rate, increases intestinal and gland activity, and relaxes sphincter muscles in the gastrointestinal tract”. The parasympathetic nervous system (PNS) is responsible for involuntary movement, which means you don’t always know when it is working and when it is struggling to keep up or is blocked. The PNS controls crying, salivation, urination, and digestion and works when it is at rest. Insomnia can dramatically decrease your PNS’s ability to function at full capacity.
Fortunately, the benefits of yoga, such as lowered stress, reduced blood pressure and better circulation, increase the activation of the PNS leading to better mental relaxation and better sleep.
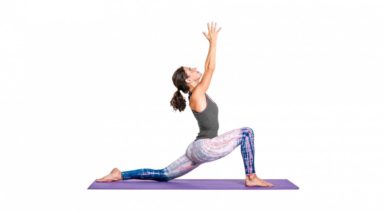
One technique you may consider for preventing those sleepless nights is a regular yoga practice, especially gentle yoga in the evening. This is probably different from the yoga you practice in a studio. It is similar to restorative yoga in that it concentrates on low tension positions. Think of it more as stretching with a focus on your breath and calming your mind. If you find a few positions you really like, add them into your bedtime routine.
Relaxation is crucial to combatting insomnia. By focusing on your body, you are less likely to let your brain takeover and more likely to put aside the daily stressors to prepare for bedtime. In addition, yoga helps slow your breath, which should leave you feeling more calm. A few poses that are ideal for this include:
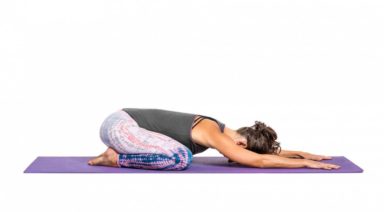
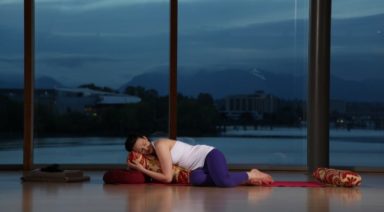
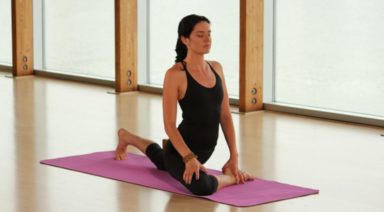
Child’s Pose – Balasana
Benefits
A common resting pose to regain control of your breath after a round of more challenging postures or movements, this position has virtues of its own when performed in isolation. It opens your hips, allows for better circulation, and most importantly, helps relax your mind.
Give it a Try
Begin in tabletop pose with your hands and knees on your mat. Your hands should be firmly below your shoulders and your knees below your hips. Next, sit back on your heels and spread your knees to the edges of your mat. While gently lowering your forehead to your mat, reach your hands at the top of your mat. Stay this way for several minutes. Focus on your breath. Breath in and out slowly. Concentrate on every inhale and exhale.
After a few minutes, spread you knees wider, which should sink your head lower into your mat. Stretch your arms farther up your mat and shift your focus to your fingertips. Fan out your fingers and press them into the mat. Remain here for several more minutes, then slowly lift your head and open your eyes. If that felt good, repeat two to three times before climbing into bed.
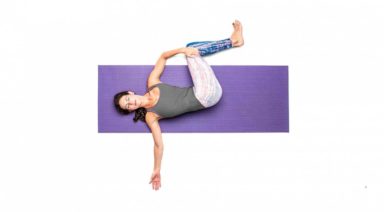
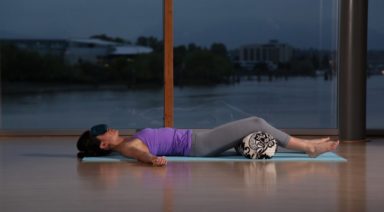
Supine Spinal Twist – Supta Matsyendrasana
Benefits
Opens your chest and stretches out your leg muscles. Alleviates pain in your lower back. Persistent back pain can often keep you tossing and turning at night.
Give it a Try
You can do this on a mat, soft carpet, or even in bed. Being by lying down on your back with your arms out to the sides, so that your body is in a “T” shape. As you inhale, lift your heels off the ground. Exhale and lower your heels back down, turning your knees to the left side of your body. Keep your knees stacked on top of each other.
Continue to focus on your breath, while turning your head to the right. Allow your right shoulder to press deeper into the mat maintaining the twist through the upper spine. Gently place one hand on top of your knees to deepen the stretch. Hold for at least 20 seconds, but feel free to stay in this position as long as you like, then repeat the stretch on the other side.
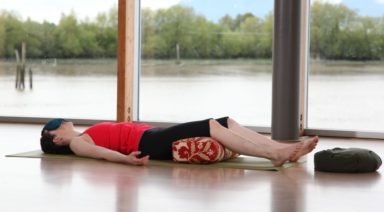
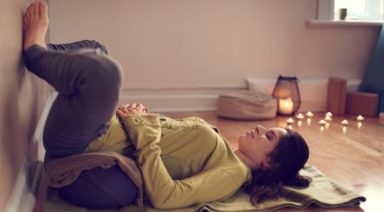
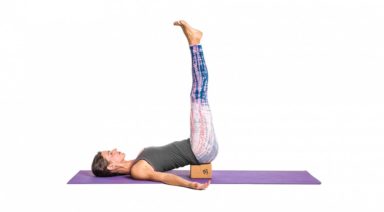
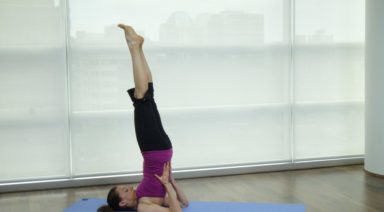
Legs Up The Wall Pose – Viparita Karani
Benefits
Lessens menstrual cramps and headaches, relives lower back pain and stress, and reduces the weight off the body which will help ease you into sleep.
Give it a Try
This position requires some set-up. First, grab two large blankets and a small towel/eye mask to put over your eyes. Fold one blanket in half and place it on top of your mat. Both your mat and the folded blanket should be along a wall so that your entire back will fit on top. Then, fold a second blanket thicker than the first and place to the side.
Lie on top of the first blanket with your seat against the wall and legs going up the wall. Place the folded blanket under your seat so that it elevates your seat and keeps your back on the ground. Your body should be in an “L” shape with the floor and the wall, if there is any space, gently shimmy your body forward so that you are making full contact with the wall.
Once your body is positioned, place the small towel/eye mask over your eyes and rest your arms along your sides. Allow your mind to empty. Focus on your breath and enjoy the sensations in your legs, as you stay in this position for about five minutes.
Cat-Cows – Chakravakasana
Benefits
This is a great position before bedtime if you spend most of your day sitting. Quickly builds heat and sheds extra energy to help you ease into sleep.
Give it a Try
Begin in tabletop position (same as Child’s Pose). Make sure your wrists are right under your shoulders and knees under your hips. Let go of any tension in your back and allow your spine to retain a neutral position.
Curl your toes under and tilt your pelvis back. Your seat should be raised, your back in a “U” shape and your gauze should be forward and slightly up towards the ceiling. You are now in the cow pose. Hold for a long exhale.
To transition into the cat pose, uncurl your feet so that your soles are facing up. Tip your pelvis forward and tuck your tailbone. Move your gauze down to your mat, allowing your head to follow and your spine to form an inverted “U.” Pull your navel into your spine and hold. Hold for a long inhale.
Inhale and exhale for several rounds. Remember to form a cat pose on inhale and a cow pose to exhale. Do this for at least three minutes, then rest in child’s pose. If you are still feeling restless, do two or three more rounds just like the first.
Happy Baby – Ananda Balasana
Benefits
Lubricates your joints, calms the mind, and releases tensions in the body.
Give it a Try
This is an easy, fun one. First, lie on your back on top of your mat. Hug your knees into your chest. Take 10-15 seconds in the pose to warm-up your body. Then, grab the soles of your feet (or ankles if grabbing your feet is impossible or uncomfortable). Using your hands, pull your legs apart and to the sides and hold the stretch for another 10-15 seconds. If it feels good, gently rock from left to right. Allow your head and shoulders to press deeper into the mat. Lastly, let go of your feet and return to hugging your knees. Repeat this exercise as many times as desired.
Pigeon Pose – Kapotasana
Benefits
Relieves tension in the chest and shoulders. Also, helps to relieve stress and anxiety.
Give it a Try
Begin the same way as Child’s Pose or Cat-Cows exercise – in tabletop pose with your hands and knees on your mat. Bring your right knee as far forward as it will go comfortably and slide slightly to the right of your body. Your toes should naturally tuck under your seat.
Shifting your focus to your left leg, slide your left leg as far back as possible. Make sure the soles of your feet face upwards. Place your hands on either side of your legs.
Then on exhale, extend your arms forward to the top of your mat, lay your torso down over your right leg, and lower your forehead onto your mat. Stay here for ten breaths. Then, deepen your stretch as much as possible by sinking into your hips and stay for another ten breaths.
Next Steps
You don’t have to resort to expensive, potential harmful prescription drugs to get a good night’s sleep. In addition to the pre-bedtime yoga positions suggested above, there are Ayurvedic sleep remedies and other natural techniques you can use to help you drift off to sleep and stay asleep, including:
- Routine. Routine. Routine. I can’t stress this enough. The simple act of doing your bedtime rituals in the same order can help remind your brain it is time to sleep. Make a list of what you typically do before bed and stick to it as much as possible.
- Your Bedroom. Is your sleeping space conducive to sleeping? If there are any lingering signs of work, get it out of there! Your bedroom should be exclusively used for two things. (I’ll let you read in between the lines on that one.)
- Relaxing Music can help you wind down. You want music that doesn’t have lyrics and won’t keep your mind racing.
- Scents can change your mood. I swear by an aromatherapy scent that I use before bedtime or anytime I am stressed. I have it in lotion, candles, and pillow spray.
- Write it down. Keeping a pen and paper on your nightstand can be an easy way to add things to your to-do and get them off your mind.
- More Yoga. There are other types of yoga that can be beneficial, including Kundalini Yoga and Yoga Nidra.
Yoga Nidra is one of my favorite things in the world. In fact, I treat myself to it for my birthday every year. It is essentially a yoga nap which will have you drifting off to sleep in no time.