Yoga for Injury and Trauma

After a traumatic event you need to be discerning to determine when to get moving and grooving again. If you are healing from medical issues, it may be appropriate to ask your physician. When your body and spirit are ready for active healing, your intuition will sense that it’s time to get moving. Listen to your inner voice of wisdom!
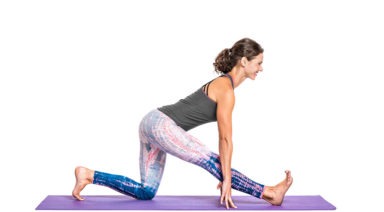
Therapeutic Yoga Practices to Get You Moving Again
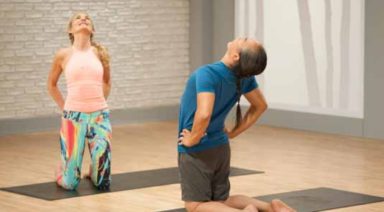
1. Sun Salutations
Sun salutations bring the energetic quality of the sun into your body. Warmth, growth, energy, lightness, upliftedness.
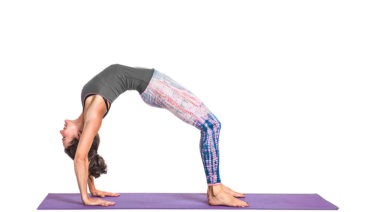
2. Moon Salutations
Moon salutations bring the cooling, divine feminine, dark-side and circular energy. A complement to sun salutations, done as a flow that circles from the first to last pose in a mandala or a round fluid flow. Go as quickly or slowly as your body wants you to.
3. Meditate on Comfort
This practice is a powerful agent to shift perception. Use this meditation to change focus from pain to pleasure. Appropriate for people dealing with chronic or acute physical pain, or a sudden trauma.
4. Yoga Nidra
Yoga Nidra is a deep relaxation that translates to “Yoga sleep,” meant to align the subconscious and conscious mind, allowing practitioners to behave more like their authentic self. By deeply relaxing and accessing the heart’s truest desire, yogis can then walk in alignment with their heart in thought, word, and deed.
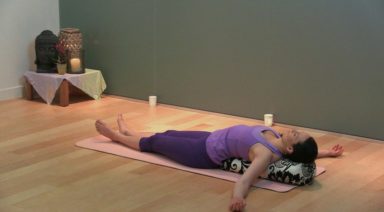
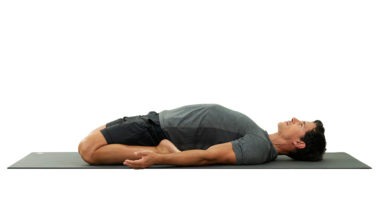
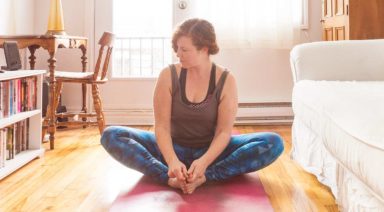
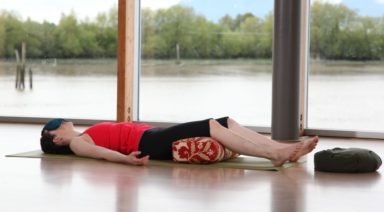
5. Savasansa
Regardless of where you are on a personal healing journey, you need rest. That is why you should practice savasana. Savasana may be used to relax, let go and surrender. There are many ways you can do savasana. Try out a few approaches to find what works best for you. You can simply lay flat on the floor on your back, palms up, legs relaxed. You may cover yourself in blankets, or place a heavy blanket folded over the hips and belly, for a more secure feeling. You may choose to prop your legs with bolsters, or legs up the wall, or on a chair.
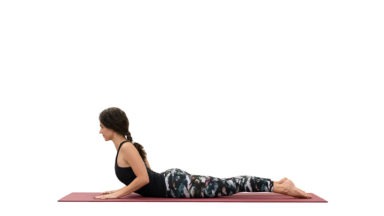
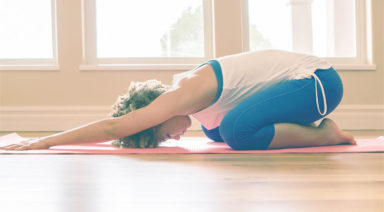
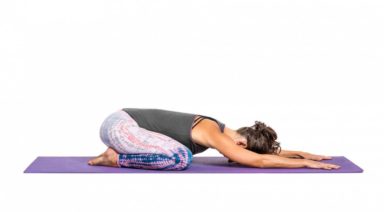
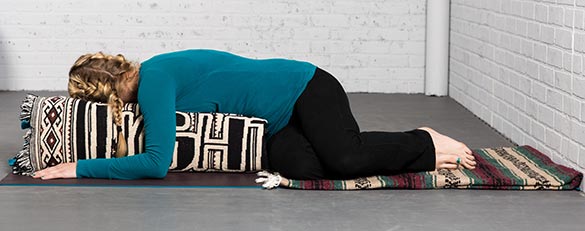
6. Child’s Pose (on a Bolster)
This pose will melt away stress; lengthen the spine safely for almost anybody, even if you have disc injuries. As with all forward folds, this pose is calming on a physiological level.
In this pose, your spread knees apart on a yoga blanket. The bolster, which is a supportive pillow, holds up the head and chest, keeping the back level, rendering it safe for most disc injuries. The warm herb pillow makes your spine happy as you breathe and relax.

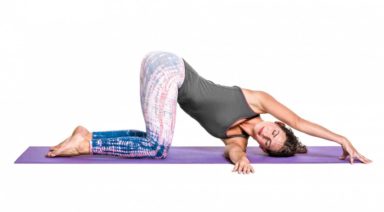
7. Prone Spinal Twist with Bolster
This posture is safe for almost anyone. It combats the discomfort of sitting too much. It loosens up the hips and oblique muscles and opens the chest. It allows practitioners to slow down, which is where much of the magic happens.
In this posture, use a bolster lengthwise on the mat. Lay the chest onto the bolster and allow the hips to be on the mat below. Ensure that both knees and the face are looking in the same direction. Add a folded yoga blanket between the legs to protect the knees and ankles. Aim to take about 10-30 breaths, slowly letting the chest turn more and more toward the bolster. Drift deeply into relaxation before repeating on the second side. Make sure to transition from one side to the other gently and to remain in the pose on the second side for just as long as the first side.
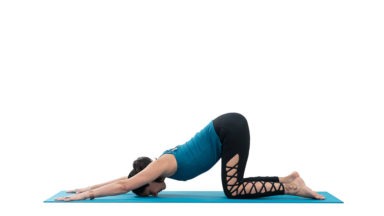
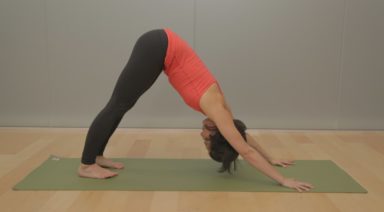
8. Downward Dog on the Wall
 Source: Suzanne Wright Yoga
This pose is safe for people with (most) shoulder injuries, pregnant bodies (although most pregnant bodies CAN do a typical downward dog) and for people who can not do weight bearing with the shoulders, to access the therapeutic benefits of spinal lengthening, blood circulation, and the alignment associated with downward dog.
This pose looks like the letter L turned upside down. Hinge your body at a 90° angle at the hips, arms extended. Place your palms and spreading fingers on the wall at shoulder width distance, your wrists and hips at hip height. You know your feet are far enough from the wall when they are flat on the floor facing the wall and, your hands flush with the wall, arms and spine extended. Be sure to bend your knees slightly and draw your tailbone backwards to lengthen the spine and protect the hamstrings.


About the Author
Yoga and Trauma

The benefits of a yoga practice include building flexibility, strength, agility, balance, and concentration. However, a regular yoga practice can help anyone dealing with the stress of facing military deployment, being homeless, being in prison or recovering from alcohol and substance abuse.
The commitment of yoga teachers and therapists for their work bringing trauma-sensitive yoga and meditation to veterans, prisoners, persons with eating disorders, and those in recovery from addictions — with powerful results — is deep and impressive. It is tempting for me to write a book about each of these worthy people. Instead, over the past four years, I’ve interviewed many of them for a Huffington Post blog series called “Yoga, How We Serve.”
In their interviews, these women and men shared the unique needs of survivors of trauma, lessons learned in doing this work and how existing resources and treatments generally do not adequately address the needs of these populations. Here is just one of many extraordinary comments from a Vietnam War veteran in a program called Mindful Yoga Therapy:
“As I started to practice daily, I noticed several things happening. First, I began to sleep better. Next, I was getting to know myself, for the first time ever. Slowly I came off all of my psych meds. That was big! For the first time in over 40 years, I was medication free. Over the years, I’ve been on over 23 different kinds of medications, from Ativan to Xanax! Yoga is now my therapy.”
Vietnam War Veteran
This veteran went on to say he hopes that yoga will someday be offered to all veterans, and offered to our troops during basic training.
I very much share this hope, because the costs of treating trauma—whether it occurred 40 years ago or in the past decade, have become a major concern in our society. According to the Centers for Disease Control and Prevention, the economic burden of trauma is more than $585 billion annually in the U.S., including both health care costs and lost productivity.
The CDC also measures “Life Years Lost,” used to account for the age at which deaths occur, which gives greater weight to deaths occurring at younger ages and lower weights to deaths that occur at older ages. It turns out that the impact on life-years lost from trauma is equal to the life-years lost from cancer, heart disease, and HIV combined.
Statistics can’t say much about the personal burdens of individuals and families, of how individual sufferers are impacted, but it’s still instructive to mention one or two more here. For instance, there is an average of 293,066 victims of sexual assault or rape each year in the US, with someone in the United States being sexually assaulted every 107 seconds. And roughly 22 veterans commit suicide every day from the effects of PTS symptoms, one every 65 minutes.
What is Trauma?
The word “trauma” comes from the Greek, and means “a wound” resulting from an emotional or psychological injury or experience that causes someone to have mental or emotional problems, usually for a long time. According to Bessel van der Kolk, “Trauma, by definition, is unbearable and intolerable. Most rape victims, combat soldiers, and children who have been molested become so upset when they think about what they experienced that they try to push it out of their minds…The survivor’s energy now becomes focused on suppressing inner chaos, at the expense of spontaneous involvement in their lives.”
Yoga for Recovery
The lives of many trauma survivors revolve around coping with the constant sense of danger they feel in their bodies. It is typically difficult for them to feel completely relaxed and physically safe in their bodies. As Yoga of 12-Step Recovery (Y12SR) founder Nikki Myers puts it, “Sustainable addiction recovery is about more than the mind…the issues live in our tissues.” Y12SR is a rich framework for integrating the wisdom of yoga and the practical tools of 12-step programs, with Y12SR meetings available nationwide, and the curriculum quickly becoming a feature of addiction recovery treatment centers across the United States.
Sexual Assault
Yoga helps one reconnect with the body, giving the opportunity to discharge accumulated stress and anxiety, and restoring the human organism to safety. Sabrina Seronello’s story paints this picture: she was on active duty in the Air Force from March 2000-March 2006, working as a medic in the emergency department of a Level 1 trauma center at Wilford Hall Medical Center, Lackland AFB. Sabrina deployed to Iraq in January 2005 to the Air Force Theater Hospital, a Level III (injured patients and emergency operations) trauma center. Given what she saw and experienced taking care of the wounded in Iraq, and being a victim of sexual assault while in active duty, she had been suffering anxiety and panic attacks. Upon returning from Iraq she was introduced to yoga and saw how it helped her deal with post-traumatic stress, anxiety and depression. In 2013 she started teaching a regular weekly yoga class to incarcerated veterans at San Quentin State Prison in CA under the Prison Yoga Project.
Trauma-sensitive yoga programs are becoming more available at domestic violence shelters, and universities are offering them for survivors of sexual assault. Caitlin Lanier was sexually assaulted during her freshman year of college. This assault led to issues with anorexia, cutting and otherwise trying to numb her uncomfortable feelings. According to Caitlin, “those were just outward manifestations. Inside, I felt broken, ugly, lost, like I couldn’t trust anyone, and so sad.” Caitlin has recently pioneered several trauma-sensitive yoga programs in the Boise, Idaho, area, including at a domestic violence shelter, and at Boise State and the College of Idaho. She also trains local yoga teachers on the neuroscience of trauma and how to integrate trauma-sensitive practices into their teaching. She has woven breathing techniques and mindfulness into a weekly support group for survivors of domestic violence that she co-leads with a licensed clinical social worker.
Combat-Related PTS
People with post-traumatic stress (PTS) who practice yoga report better sleep, improved focus and concentration, less anger and irritability, and exhibit an overall greater ability to enjoy life in the present moment. The Mindful Yoga Therapy has been found to be especially helpful for veterans who are also participating in evidence-based psychotherapy for PTS. “Yoga is like a gyro that brings me back into equilibrium when dealing with the effects of my disorder,” says Paul, a Vietnam War veteran.
Yoga for Prisoners
Breath work, three extended exhales, is part and parcel of the Prison Yoga Project protocol for addressing symptoms of un-discharged traumatic stress, according to James Fox, Founder and Director. He says “the extended exhale serves as the body’s built-in release valve to discharge stress and anxiety.” This is confirmed from current and former prisoners at San Quentin State Prison who have been part of the yoga program. “It was mainly because of the inner peace and trust that I have developed and nurtured through my yoga practice that I was able to respond to a confrontational situation with calm.”—B.B. Or “I’m able to stay grounded by getting into my breathing which takes my focus off stressful, traumatic events such as flashbacks. It keeps me mindful mentally and physically and enhances my self control.” –D.B.
Yoga & Eating Disorders
Finally, yoga can become a game-changer in combating eating disorders. An estimated 24 million Americans suffer from an eating disorder (anorexia, bulimia, or binge eating). Chelsea Roff took her first yoga class at the suggestion of a therapist just a few months after getting out of the hospital for eating disorder treatment. “The short story is that yoga brought me to a place in my recovery that no form of talk therapy or medical treatment ever had before. Downward dog certainly didn’t cure my eating disorder, but the practice did teach me how to relate to my body in a more compassionate way. And more importantly, perhaps, going to yoga introduced me to community–to the people I soon came to consider family–and I suppose that’s exactly what I needed to fully step into recovery,“ she says.
Health Care Costs
What if the over one-half of teenage girls and nearly one-third of teenage boys who use unhealthy weight control behaviors such as skipping meals, fasting, smoking cigarettes, vomiting, and taking laxatives, were offered regular yoga classes? Regular trauma-sensitive yoga classes for victims of trauma can help reduce our nation’s health care costs on a larger scale, as they address cognitive, emotional, and physiological symptoms associated with trauma. But a cultural change is required to make this happen. The current system is broken, because it overly relies on medical therapy and cognitive behavioral therapy, both of which are very costly without commensurate relief from symptoms.
According to Kantar Media, the heath care industry spent $14 billion on advertising alone in 2014, enough to fund over 215,000 trauma sensitive yoga classes. Especially for PTS, mainstream therapies have resulted in patients remaining significantly symptomatic after treatment, with additional problems including addiction, difficulties maintaining work, and homelessness.
The results are adding up to a national calamity that leaves human lives in ruins, particularly for men and women who have risked their lives to serve our country and need our help. According the Congressional Budget Office’s report on PTSD and Traumatic Brain Injury among recent combat veterans, the average cost of treatment in the first year is $8,300 per patient and $4,100 in the following years. The average cost of treating an eating disorder is $1,250 per day, and only 1 in 10 sufferers ever receive treatment. Eating disorders have the highest mortality rate of any mental illness. Such treatment is expensive not only for patients, but for insurance companies, and society at large.
Further Reading
The evidence base for the effectiveness of yoga in addressing trauma is extensive. Here are some resources for further reading: the textbook on trauma and body-mind practices by Bessel van der Kolk, MD, The Body Keeps The Score: Memory and Psychobiology of Post Traumatic Stress; Overcoming Trauma Through Yoga by David Emerson and Elizabeth Hopper; The Trauma Toolkit: Healing PTSD From The Inside Out by Susan Pease Banitt; and Intelligence In The Flesh by Guy Claxton.
Learn more about Give Back Yoga Foundation and how you can get involved.